Tips_tutorials > Studio101 > Studio 101 (All Contents)
Introduction
Welcome to the tutorial.
The Studio 101 tutorial is the first in a series of tutorials which take you step by step through writing an application using Omnis Studio. Along the way you will create and learn about, SQL database server tables, schema classes, table classes, windows, complex grids, reports, query classes, superclasses and subclasses, error handler object, headed lists, subwindows, and lots more.
This Studio 101 tutorial assumes that you have very little prior experience with Omnis Studio or writing notation in Omnis Studio, and that you have very experience with SQL (Structured Query Language). Each of the Studio 100 series tutorials builds on the next, so you need to go through them in order.
In this tutorial you will:
- Create a new library.
- Use the SQL Brower to create a new database and open a session with the database.
- Create a schema class and use it to create a table in the database.
- Create tables in the database using SQL.
- Insert records into the database using SQL.
- Open a session with the database using a session object and notation in the startup task.
- Create a menu class and open it from the startup task.
- Create a table class, add custom methods to fetch records, set primary keys, and override the Omnis Studio built-in $dowork method.
- Create a window class with a complex grid for entering and editing records.
- Create a report class and print a report of the records in the database.
Conventions Used in this Tutorial
As stated in the introduction, the Studio 101 tutorial assumes that you have very little prior experience with Omnis Studio or writing Omnis notation, and that you have very little experience with SQL (Structured Query Language).
To follow the code in this tutorial you will need to print and review the Naming Conventions page found on the studiotips.net website.
Every developer has their own naming conventions. Feel free to use your own, or adopt some or all of the naming conventions which I use. The naming conventions which I use have been influenced by Steve McConnell's excellent book, . I recommend that you order a copy of from Amazon and read it. is a must read for programmers.
Here are some examples of naming conventions that you need to know as you look at the code in this tutorial.
- Lower case i variable prefix indicates an instance variable. (iList, iTitle)
- Lower case c variable prefix indicates an class variable. (cDateFrom, cDateTo)
- Lower case p variable prefix indicates a parameter variable. (pDateFrom, pDateTo)
- Absense of a lower case i, c, or p variable prefix indicates a local variable. (List, Title, DateFrom, DateTo)
- Lower case r in the variable prefix indicates an item reference type variable. (irButton, rWin, prWin)
- Lower case b in the variable prefix indicates a boolean type variable. (bShowActive, ibShowActive, pbShowActive)
- Variable with the word List in the variable name indicates a list variable. (iList, pList, CountriesList)
- Variable with the word Row in the variable name indicates a row variable. (iRow, pRow
I have tried to comment the code well enough to make it easy for you to follow. If there are places where you would like to see more comments or details, please send an email doug@vencor.ca If you are confused, chances are that others will be as well. You'll be doing those that follow you a favor by getting me to clarify things better in the tutorial.
If you see any typos, grammar errors, or code errors, please send me an email specifying the error and the section where it is found so that I can correct it for future users of this tutorial.
Special font styles have been used in the on-line version of this tutorial to help you.
- Text which you have to enter looks like this.
- File names, folder names, and path names look like this.
- Library names, class names, method name, and code looks like this.
- Menu names, button names, window titles, button names look like .
- Words with extra emphasis look like this.
- Words with strong emphasis look like this.
Special paragraphs appear as follows:

This is something you should note.

This is a helpful tip.

This is a warning.
; This would be a block of code.
; Though in this case there isn't any code in this block.
A series of steps will often be abbreviated as follows:
> Contacts > double-click sCountry
In expanded form, the above line would read, "Press the F2 function key to open the window, select the Contacts library, then double-click the sCountry schema class."
The backslash (/) character is used as the file path delimiter. (eg. Desktop/Contacts/data/ContactData.df1) You would replace the backslash with the applicable file path delimiter for the platform you are working on.
The F6 Property Manager window allows to you to view and edit various properties. The properties are listed in lower case. In Omnis notation the property names are prefixed with the $ character. e.g. The window title property is $title. Property names in this tutorial always include the $ prefix.Glossary
RDBMS - Relational Databse Management System
SQL - Structured Query Language
StudioTips - A set of Omnis Studio libraries which provide additional details, code samples, tips, and warning for Omnis Studio developers.
StudioWorks - A framework written in Omnis Studio for rapid application development.StudioTips Browser
If you are a StudioTips member you should have a copy of the tipsStudio101.lbs library in your studiotips/docs folder. All of the code in this tutorial is available to you in the tipsStudio101 library.
You will also have the completed Studio 101 tutorial in the studiotips/tutorial/Contacts folder. The library file name is Contacts101.lbs.
You can access the code in this tutorial, and copy and paste it to your Contacts library as follows:
- Open the window.
- Select the in the group selector droplist at the top left corner of the window.
- Each of the sections in this tutorial will be listed in the treelist.
- When you click on a node in the treelist the topic text is displayed to the right of the treelist.
- If a topic includes code a button will appear at the bottom of the window. Click the button to open the sample code in the method editor window.
- Copy the sample code to the clipboard.
- Close the method editor.
- Go the the applicable class and method in your library and paste the code into your method.
Personal Biases
Everyone has certain biases when it come to programming so it is best that I tell you my biases.
- The Omnis data file is a decent SQL learning tool and useable for single user applications. If you get into multi-user applications or mission critical data you should move to a real RDBMS (Relational Database Management System). The good news is that Omnis Studio makes it very easy to connect your application to different RDBMSs.
- I prefer to use Omnis notation rather than the Omnis Omnis commands. Notation might seem harder to write, but it is much more flexible and powerful that the Omnis Omnis commands. Once you start to understand the syntax of Omnis notation is gets easier to follow and write. I am not speaking against the Omnis Omnis commands and wouldn't get into an argument over which is better. Notation is my personal bias.
- I only use SQL for communicating with the Omnis data file. You could use Omnis Omnis commands (Open data file, Set main file, Prepare for insert, Update files,...) but that marries you to the Omnis data file, excluding other RDBMSs. Using SQL exclusively is my personal bias.
- I believe in the power of community and therefore promote StudioWorks. The vision of StudioWorks is to build a community of highly effective Omnis Studio developers who benefit from each by working together on a common framework. The StudioWorks framework is a set of libraries that include a host of classes and code which is commonly used for writing custom software applications in Omnis Studio. The StudioWorks framework source libraries are completely open to StudioWorks members. You will hear me talk about StudioWorks in these tutorials. It is something I believe in, so I can't help but talk about it from time to time. Hope you'll understand.
Getting Started
In this section of the tutorial we we will prepare the folders and add the files needed for a Contacts application which we will be building. We will also create a table in the database and insert some records.
You will need a developer version of Omnis Studio. The standard edition v4.0 is the minimum version.
One of the features I really like about Omnis Studio version 4 is the notation helper. It save a lot of keystrokes. I find the default setting of 1000 milliseconds a bit slow and recommend you reduce the setting to 50 milliseconds.
- Open the Omnis Studio > Property Manager window > General tab
- Set the $notationhelptimer value to 50
Create Folders
We need to create some folders on your computer's hard drive to contain the Omnis Studio library and data file which we are going to create.
- Create a new folder on your desktop.
- Name the new folder Contacts. The Omnis Studio library will be contained in this folder.
- Create a subfolder inside the Contacts folder.
- Name the subfolder data. The Omnis Studio data file will be contained in this subfolder.
Once the files are added the folder/file structure will be as follows:

Create Library
We need an Omnis Studio library to contain the classes and code which make up our Omnis Studio application.
- Open Omnis Studio.
- > select node > click .
- Navigate to the Contacts folder on your desktop and enter Contacts.lbs for the library name.
- Click the button. Omnis Studio creates the new library file and opens it. You will see a Contacts library in the treelist.
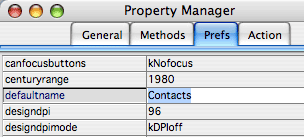
By default the library name matches the file name. If the file name changes, so does the library name. Changing the library name causes problems in multi-library applications, so it is a good practice to set the $defaultname library property. - Select the Contacts library in the treelist > > tab.
- Enter Contacts in the $defaultname property.
Create Data File
We need a database to store the records created by our Omnis Studio application. The database could be any third party RDBMS. For this tutorial will be we using the Omnis data file for the database.
- > select > click .
- Select the OMNISSQL session and click .
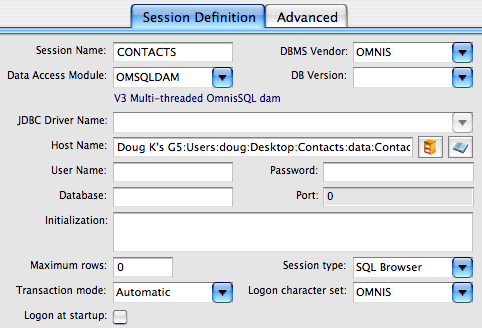
- Double-click the duplicate session to edit the session settings.
- Change the session name to CONTACTS.
- Click the button. (The file cabinet button at the end of the entry field.)
- Navigate to the Contacts/data subfolder.
- Enter ContactsData.df1 for the data file name and click the button. Omnis Studio will create the data file and the path to the data file will appear in the entry field.
- Click the button.
- Click the button.
- Click the button.
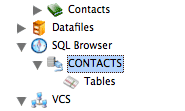
- Click the CONTACTS session. Omnis Studio will open a SQL session with the ContactsData.df1 data file and CONTACTS will appears as a child node of in the treelist.
Create a Table from a Schema Class
Within the database we need to create tables. Each table stores a set of records.
Tables have columns. The columns store specific fields of information about each record.
To begin we will create a Country table for storing the names of different countries. There are numerous ways of creating tables in Omnis Studio.
First we will create the Country table by creating a schema class and then dragging the schema class on to the CONTACTS session in the .
- > select library > click > click .
- Name the new schema, sCountry.
- Double-click the sCountry schema class.
- Enter Country as the .
- In row 1 of the schema class enter the following:
- Country_pkey
- Number
- Long integer
- kTrue
- kTrue
This is the primary key column. The primary key must be unique for each record in the table. The primary key is normally hidden from the user and once created is normally never changed. - In row 2 of the schema class enter the following:
- CountryName
- Character
- 30
- kFalse
- kTrue

- Close the sCountry schema class.
- > select sCounty and drag it onto the CONTACTS session of the node. Omnis Studio will automatically create the Country table in the ContactsData.df1 data file with the columns specified in the schema class.
- > > CONTACTS > > select Country > click .
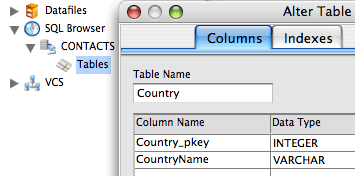
- You will see that Omnis Studio has created the table with the columns specified in the sCountry schema class. One problem with this technique of creating tables from schema classes is that Omnis Studio does not create any indexes or constraints for you. If you click the tab in the window you will see that no indexes have been created. The primary key should always have a unique index, and in this table we want the CountryName to also have a unique index. The indexes will have to be added using SQL scripts.
- Close the window.
- F2 Browser > select the Country table > click > click to delete the table.
Create a Table using SQL
This time we will create the Country table using SQL.
- > > select CONTACTS session > click
- Enter the following SQL script in the Interactive SQL window:
CREATE TABLE Country (Country_pkey INTEGER NOT NULL,CountryName VARCHAR (30) NOT NULL)
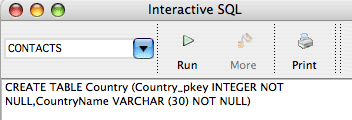
- Click the button to execute the SQL script.
- Enter the following SQL script in the Interactive SQL window to create a unique index on the primary key column:
CREATE CASE SENSITIVE UNIQUE INDEX Country_pkey ON Country (Country_pkey)
- Click the button to execute the SQL script.
- Enter the following SQL script in the Interactive SQL window to create a unique index on the CountryName column:
CREATE CASE SENSITIVE UNIQUE INDEX CountryName ON Country (CountryName)
- Click the button to execute the SQL script.
- > > select CONTACTS session > > select Country > click
- This time if you click the tab in the window you will see the unique indexes which were created by the SQL scripts which we executed.

The above SQL scripts used to create the unique indexes is specific to the Omnis data file. For creating unique index constraints on other databases check the documentation specific to the RDBMS.
Insert Data
Insert some data into the Country table using the .
- > > select CONTACTS session > click
- Enter the following:
- 1001
- Australia - Click the button.
- Close the window.
- Click . The country which you entered should show up in the list.
Insert some more data into the Country table using SQL scripts.
- > > select CONTACTS session > click
- Enter the following SQL script:
INSERT INTO Country VALUES (1002,'Canada')
Be sure to include the quotes around the country name. - Click the button.
- Repeat the above steps for:
INSERT INTO Country VALUES (1003,'UK')
INSERT INTO Country VALUES (1004,'USA') - Close the window.
- Click . The countries which you entered should show up in the list.
Summary
In this section of the tutorial we have completed the following:
- Created the folders which contain our Contacts application.
- Created a library which wil contain the classes and code for our application.
- Created a database to store information for our application.
- Created a Country table in the database using SQL.
- Added some country records to the table using SQL.
Startup Task
When the Contacts library is opened, Omnis Studio instantiates the Startup_Task and sends it a $construct message. (Omnis Studio call the $construct method)
Any code we want executed when the Contacts library is opened must be entered (or called from) the $construct method of the Startup_Task.
In this section we will add code to the startup task to open a session with the database and install a main menu.Logon Session Object
We will use a task variable to instantiate a session object which will be used to open a session with the database. By using a task variable of the Startup_Task, the session will remain open as long as the Contacts library is open.
- > Contacts library > double-click Startup_Task.
- list > tab > enter a new variable as follows:
- dbsessionobj (Database Session Object)
- Object - click the dropdown button > open the node > select
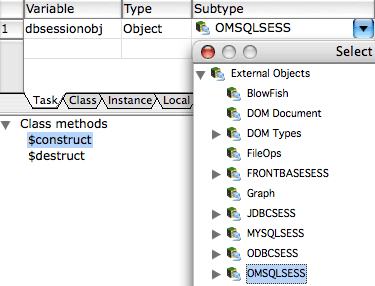
When the Startup_Task is instantiated, the dbsessionobj task variable will instantiate the OMSQLSESS external object. The object is used to open a session with the Omnis data file.
The next step is to add code which will open the session when the Contacts library is opened.
- Select the $construct method of the Startup_Task of the Contacts library.
- Enter the following code in the $construct method using the instructions immediately after this block of code. The instructions walk you through some helpful techniques for writing code in Omnis Studio.
; Calculate the path to the data file.
Do FileOps.$splitpathname($clib.$pathname,Drive,FolderPath,FileName,Ext)
Calculate DataFilePath as con(Drive,FolderPath,'data',sys(9),'ContactsData.df1')
; Check to make sure the file exists.
Do FileOps.$doesfileexist(DataFilePath) Returns FlagOK
If not(FlagOK)
OK message [sys(85)] (Icon) {Unable to find the data file.////File path: [DataFilePath]}
Else
; Open a session with the data file.
Calculate HostName as DataFilePath
Calculate UserName as 'SYS'
Calculate Password as ''
Calculate SessionName as 'CONTACTS_01'
Do dbsessionobj.$logon(DataFilePath,UserName,Password,SessionName) Returns FlagOK
If not(FlagOK)
OK message [sys(85)] (Icon) {Unable to logon to the data file.////SessionName: [SessionName]////Host Name: [HostName]}
End If
End If - Enter the comment line ; Calculate the path to the data file.
- Go to the next line, an empty method line, and type Do. This selects the Do command.
- Press the Tab key to move to the field.
- Press F9 to open the F9 Catalog > select tab > select > select .
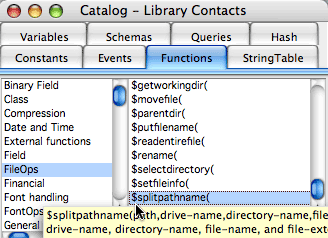
- Drag the method to the field of your Do command. Omnis Studio very kindly enters FileOps.$splitpathname with all of its parameters into the field for you.
- Change the output parameters to %% prefixed local variable names. e.g. Change drive-name to %%Drive.

Omnis Studio kindly creates %% prefixed character local variables on-the-fly for you.
If you were to use a single % character prefix Omnis Studio would create a floating point number local variable for you. - Select the variables tab and remove the %% prefixes from the variable names.

It is not a good idea to leave % prefixed variables in your method code. If you use % prefixed variables and accidentally mistype the % prefixed variable Omnis Studio will create a new local variable on-the-fly. If this goes unnoticed you will have created a bug in your method which is difficult to detect.
- Continue entering the code. When you get to Do dbsessionobj.$logon(... use the as follows to help you enter the code.
- Select an empty method line and type Do. This selects the Do command.
- Press the Tab key to move to the field.
- Right-click on the dbsessionobj task variable in the pane and select . This opens the window showing you all of the methods and properties available to you.
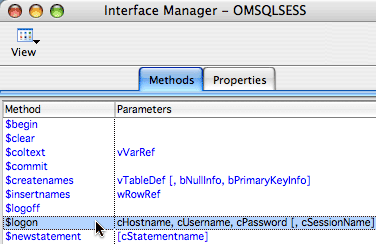
- Drag the method to the field of your Do command.
Omnis Studio very kindly enters dbsessionobj.$logon and all the parameters in the field. All you need to do is replace the parameters with the actual input values. If you haven't yet created the input variables, you can add them on-the-fly by replacing the parameter name with a variable name that begins with %%. After Omnis Studio creates the local variables you can remove the %% prefixes if the pane. - Finish entering the $construct method code.
- Close and reopen the Contacts library startup task as follows.
- > Contacts library > right-click on the Startup_Task > select . This closes the startup task.

- Right-click again on the Startup_Task > select . This reopens the startup task. When the startup task is reopened Omnis Studio sends a $construct message to the task instance which causes our code in the $construct method to be run.
All going well the CONTACTS_01 session should appear as a child node of the node in the treelist.
Main Menu
We need to open some sort of a visual object to allow the user to interact with our application. The visual object could be a menu, toolbar, window class, or a combination of these classes.
To get things started we will create a menu class and install it from the $construct method of the Startup_Task.
- > select Contacts > click > click .
- Name the menu, mMainMenu.
- Double-click mMainMenu.
- Change the Omnis Studio menu class developer settings as follows:
- Reize the menu class window if it is too small.
- Right-click on the menu class window. If the context menu is checked, select it to uncheck it.
If is checked and you have a menu line selected in the menu window class when you press F6 to open the , instead of opening the , Omnis Studio assigns F6 as the shortcut key combination for the selected menu line. That is why I am getting you to uncheck this property. - Right-click on the menu class and select . This saves the current menu class window size and the current setting to your Omnis Studio developer preferences for the next time you open a menu class window.
- Click the empty title of the menu window class and enter Contacts as the menu title.
- Press the Return key one or two times to create a new menu line.
- > tab > set the following properties:
$name - Countries
$text - Countries... - Double-click the Countries menu line in the menu class window to get to the menu line's methods.
- Add the following code to the $event method of the Countries menu line.

As per the StudioTips local variable names that begin with a lower case r are item reference type variables. When you create the local variable rClass for the following code be sure to set the variable type to item reference.
; Find the countries list window class.
Calculate ClassName as 'wCountryList'
Do $clib.$windows.$findname(ClassName) Returns rClass
If isnull(rClass)
OK message [sys(85)] (Icon) {Unable to find the window class '[ClassName]'.}
Else
; Open an instance of the countries list window class.
Do rClass.$openonce('*') Returns rWin
If isnull(rWin)
OK message [sys(85)] (Icon) {Unable to open an instance of the window class [ClassName].}
End If
End If
Quit method rWin - Close the method editor and click on the Countries menu line in the menu class window.
- Press the Return key twice to create two new menu lines.
- > tab > set the following properties:
$name - ProgrammerTestMethod
$text - Programmer Test Method...
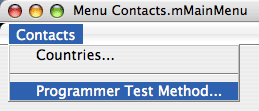
- Double-click the Progammer Test Method... menu line in the menu class window to get to the menu line's methods.
- Add the following code to the $event method of the ProgrammerTestMethod menu line.
Breakpoint
Quit method
; Add your test code below this line.
The menu line is a handy place to create and test code. We will be using the method in the next sections of this tutorial. - To open an instance of the mMainMenu class during startup add the following code to the $construct method of the Startup_Task.
; Find the main menu class.
Calculate ClassName as 'mMainMenu'
Do $clib.$menus.$findname(ClassName) Returns rClass
If isnull(rClass)
OK message [sys(85)] (Icon) {Unable to find the menu class, [ClassName].}
Else
; Open an instance of the main menu class.
; The first parameter with the $open method is the 'instance' name. It is optional.
; The 'instance' name can be different that the 'class' name.
; Here we are using 'ContactsMainMenu' as the instance name.
Do rClass.$open('ContactsMainMenu') Returns rMenu
If isnull(rMenu)
OK message [sys(85)] (Icon) {Unable to open the menu class, [ClassName].}
End If
End If - Close and reopen the Startup_Task. All going well the main menu will be installed.
- menu > select . You should get an OK message stating that the wCountryList window class could not be found. This demonstrates why anticipating possible errors and including error messages in your code is helpful to your application development.
Table Class
Table classes are non-visual classes that operate between other classes in your application and the database. Table classes give you a central point to control all of the database operations and communications. A very good thing from an object-oriented programming point of view.
Schema and query classes are used to define the columns in a list or row variable which we then use to fetch records from the database. We can not create instances of schema or query classes and we can not add methods to schema or query classes. They are simply used to define list or row variables which are mapped to tables in the database.
We can create instances of table classes and we can add methods to table classes. Once you see how this works, you begin to see how powerful table classes really are.
The Omnis Studio table classes comes with a very helpful set of built-in methods which we can see in the or through the .
In this section we will create a table class and add some custom methods to be used by our application.Create a Table Class
To create a table class as follows:
- > select Contacts library > click > click .
- Name the table class, tCountry.
- > tab > set the $sqlclassname property to sCountry.

This maps tCountry to sCountry so that the sCountry schema class is used to define the list or row variable when you define a list using the table class.
Do List.$definefromsqlclass('tCountry')
- Select the tab. Note all of the Omnis Studio built in table class methods. Of particular interest to us are the methods: $select, $fetch, $dowork. If you hover over any of the methods a tooltip will give you more information about the method.
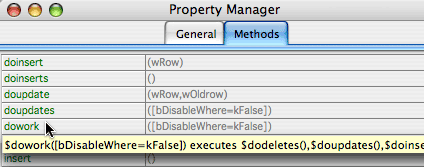
- Double-click tCountry in the .
We'll use the to test the table class:
- menu > select . This takes you to the Breakpoint of the $event method.
- Click the button in IDE toolbar > select .
- Below the Quit method enter the following code:
Do List.$definefromsqlclass('tCountry')
If List.$colcount=0
OK message [sys(85)] (Icon) {The list has zero columns after $definefromsqlclass('tCountry')}
Else
Do List.$sessionobject.$assign($ctask.dbsessionobj)
Do List.$select() Returns FlagOK
If not(FlagOK)
OK message [sys(85)] (Icon) {Flag false after $select()}
Else
Do List.$fetch(kFetchAll) Returns FetchStatus
If not(FetchStatus)
OK message [sys(85)] (Icon) {Flag false after $fetch(kFetchAll)}
End If
End If
End If - menu > select . This takes you to the Breakpoint.
- Double-click the first line of your test code to set the Go point to that line.
- Click the Step Over button in the IDE toolbar repeatedly to step through the test code.
- All going well by the last line of the test code the List variable will contain the four Country records which we inserted into the database.
- Right-click on the List variable anywhere in the code > select to view the records in the list variable.
- Close the variable window.
- Click the button in IDE toolbar > select .
Add a Custom Table Class Method
Getting all the records from a table is a common task, especially for tables like the Country table which contain a small number of records. In this section we'll add a $getAllRecords custom method to the table class to select and fetch the records.
- > select Contacts library > double-click tCountry table class.
- Right-click > select .
- Name the method, $getAllRecords.
- Enter the following code in the method:
; Calculate the ORDER BY clause.
Calculate OrderBy as "ORDER BY CountryName"
; Select all the records in the table.
Do $cinst.$select(OrderBy) Returns FlagOK
If not(FlagOK)
OK message [sys(85)] (Icon) {Flag false after $select()}
Else
; Fetch all the records in the table.
Do $cinst.$fetch(kFetchAll) Returns FetchStatus
If not(FetchStatus)
Calculate FlagOK as kFalse
OK message [sys(85)] (Icon) {Flag false after $fetch(kFetchAll)}
Else
; Set the current line to the first line.
Do $cinst.$line.$assign(1)
End If
End If
Quit method FlagOK

Notice the code is similar to our previous test code, but the variable, List, has been replaced with $cinst. This was confusing to me the first time I saw this in Omnis Studio. The reason $cinst is being used in the table class methods is that when we define a variable from a table class using Do List.$definefromsqlclass('tCountry'), we bind the variable to the table class. The list and the table class become one. Think of it like a wedding ceremony when the minister says and the two shall become one. Once the list variable and the table class are bound, and you are inside any of the table class methods, you are inside of the table class instance of the list variable, so to refer to the list, you must use $cinst rather than the list variable name.
- Go to the and remove the old code.
- Enter the following code in the :
Do List.$definefromsqlclass('tCountry')
If List.$colcount=0
OK message [sys(85)] (Icon) {The list has zero columns after $definefromsqlclass('tCountry')}
Else
Do List.$sessionobject.$assign($ctask.dbsessionobj)
; Get all the records in the table.
Do List.$getAllRecords() Returns FlagOK
End If
Test the code:
- menu > select . This takes you to the Breakpoint.
- Double-click the first line of your test code to set the Go point to that line.
- Click the Step In button in the IDE toolbar repeatedly to step through the test code.
- When you to the Do List.$getAllRecords() line of code, you will step into the tCountry.$getAllRecords method.
- Continue stepping through the $getAllRecords method until you return to the .
- All going well the custom $getAllRecords method will select, fetch, and sort the records for you.

If you accidentally or intentionally to a method and then decide you want to get out of that method and return to stepping through the code in the preceeding method click the button in the IDE toolbar. The button is a handy feature that was added in Omnis Studio v4.1.
Add a $setPrimaryKey Method
When we inserted the records into the Country table we manually set the primary key values. In this section we'll add a $setPrimaryKey custom method to automatically set the primary key to the one more than the maximum value primary key currently in the table.
- > select Contacts library > double-click tCountry table class.
- Right-click > select .
- Name the method, $setPrimaryKey.
- Enter the following code in the $setPrimaryKey method:
; Check if the primary key column is null and not zero.
Calculate ColName as 'Country_pkey'
If isnull($cinst.[ColName])&$cinst.[ColName]<>0
Calculate FlagOK as kTrue
Else
; Get a new statement object from this table instance's session object.
Do $cinst.$sessionobject().$newstatement() Returns StmntObj
; Select and fetch the maximum primary key column value froma the table's records.
Calculate TableName as 'Country'
Calculate SQLText as con("SELECT MAX(",ColName,") FROM ",TableName)
Do StmntObj.$execdirect(SQLText) Returns FlagOK
If not(FlagOK)
OK message [sys(85)] (Icon) {SQL error when issuing the following SQL Text: [SQLText]}
Else
Do StmntObj.$fetchinto(MaxPKey) Returns FetchStatus
If FetchStatus=kFetchError
Calculate FlagOK as kFalse
OK message [sys(85)] (Icon) {SQL error when fetching the max pkey after issuing the following SQL Text: [SQLText]}
Else
; If the maximum value is less than 1000, set it to 1000.
If MaxPKey<1000
Calculate MaxPKey as 1000
End If
; Set the primary key column to the maximum primary key value plus one.
Calculate $cinst.[ColName] as MaxPKey+1
End If
End If
End If
Quit method FlagOK
Let's test the method:
- Go to the and remove the old code.
- Enter the following code in the .
; Define the list binding it to the table class.
Do List.$definefromsqlclass('tCountry')
If List.$colcount=0
OK message [sys(85)] (Icon) {The list has zero columns after $definefromsqlclass('tCountry')}
Else
; Set the session object.
Do List.$sessionobject.$assign($ctask.dbsessionobj)
; Add a line to the list and make it the current line.
Do List.$add()
Do List.$line.$assign(1)
; Set the country name and the primary key.
Calculate List.CountryName as 'Italy'
Do List.$setPrimaryKey() Returns FlagOK
End If - menu > select . This takes you to the Breakpoint.
- Double-click the first line of your test code to set the Go point to that line.
- Click the Step In button in the IDE toolbar repeatedly to step through the test code.
- When you to the Do List.$setPrimaryKey() line of code, you will step into the tCountry.$setPrimaryKey method.
- Continue stepping through the $setPrimaryKey method until you return to the .
- All going well the custom $setPrimaryKey method will set the Country_pkey column value to the next primary key value, 1005.

The $setPrimaryKey code is not necessarily the code you would use to to set the primary key in a large application with lots of users. There is a problem with the $setPrimaryKey method code which we just wrote, and that is, if you are setting the primary key for a batch of records before inserting the first record, the method will keep returning the same primary key value... not good. An alternate technique which I use is to have a separate table in the database which keeps track of the last primary key for each table. If you are using a RDBMS it likely has a technique for getting a unique primary key value for each table.
Override a Built-In Table Class Method
You can override any of the Omnis Studio built-in table class methods by adding a custom method by the same name as the built-in method to the table class.
The $dowork built-in table class method is a great code saver for Omnis Studio developers.
After you define a list from a SQL class and set the session object you can set the list to be a smartlist. When you set a list to be smartlist, Omnis Studio immediately creates a history list which keeps track of the original values in the list and tracks any changes you make to the smartlist.
When you are finished with adding, updating, and deleting lines in the list you simply, Do List.$dowork(), and Omnis Studio generates and executes all the SQL for deleting, updating, and inserting, records into the database.
In this section we will add a $dowork method to override the built-in $dowork. The $dowork method will call the $setPrimaryKey method for any records being inserted, and then do the Omnis Studio default $dowork method. By making this modification the table class will be responsible for making sure the primary key is set for any new records we are inserting into the database.
- > select Contacts library > double-click tCountry table class.
- Right-click > select .
- Name the method, $dowork.
- Enter the following code in the $dowork method:
; Store the current line number.
Calculate StartLineNum as $cinst.$line
; Reduce the smartlist to the lines to be inserted only.
Do $cinst.$includelines(kRowInserted)
; Preset the flag to true before the loop.
Calculate FlagOK as kTrue
; Loop through the lines to be inserted.
For $cinst.$line from 1 to $cinst.$linecount step 1
; Set the primary key.
Do $cinst.$setPrimaryKey() Returns FlagOK
If not(FlagOK)
Break to end of loop
End If
End For
; Include all the normal list lines.
Do $cinst.$includelines(kRowInserted+kRowUnchanged+kRowUpdated)
; Restore the current line.
Do $cinst.$line.$assign(StartLineNum)
If FlagOK
; Do the built-in default $dowork method.
Do default Returns FlagOK
If not(FlagOK)
OK message [sys(85)] (Icon) {Flag false after running the default $dowork method.}
End If
End If
Quit method FlagOK
Test the code:
- Go to the and remove the old code.
- Enter the following code in the .
; Define the list binding it to the table class.
Do List.$definefromsqlclass('tCountry')
If List.$colcount=0
OK message [sys(85)] (Icon) {The list has zero columns after $definefromsqlclass('tCountry')}
Else
; Set the session object.
Do List.$sessionobject.$assign($ctask.dbsessionobj)
; Set the line to be a smartlist before adding a new line to the list.
Do List.$smartlist.$assign(kTrue)
; Add a line to the list and make it the current line.
Do List.$add()
Do List.$line.$assign(1)
; Set the country name.
Calculate List.CountryName as 'Sweden'
; Issue a $dowork to save smartlist changes to the database.
Do List.$dowork() Returns FlagOK
If FlagOK
; Get all records to check to see if the record was added.
Do List.$getAllRecords() Returns FlagOK
End If
End If - menu > select . This takes you to the Breakpoint.
- Double-click the first line of your test code to set the Go point to that line.
- Click the Step Over button in the IDE toolbar repeatedly to step through the test code.
- Before and after you the Do List.$dowork() line of code, right-click on the List variable and select to check the value of Country_pkey column. All going well the Country_pkey column value will be set to the next primary key value and the record will be inserted into the database.
Summary
In this section you have learned:
- How table classes are mapped to schema or query classes, bound to list or row variables, and assigned to a session.
- How to add custom methods to table classes.
- How to override an Omnis Studio built-in table class method by adding a custom method with the same name as the built-in method.
- How the Omnis Studio smartlist feature can save developers from writing SQL scripts for inserting, updating, and deleting records in the database.
Window Class
In this section we will create a window class which will list all of the country records in a complex grid where users will be able to add and change country records. We will use the Omnis Studio smartlist feature to take care of tracking any changes to the list and to save changes to the database.Create a Window Class
To create the window class:
- > select Contacts library > click > click .
- Name the window class, wCountryList.
- > tab > set the $title property to Countries.
- Select wCountryList in the .
- Press F8 to go to the window class methods.
- Select the $construct method and enter the following code:
; Fetch the Country records from the database.
; Define a ivar list variable using the 'tCountry' table class.
Do iList.$definefromsqlclass('tCountry')
; Set the session object in the list variable so that the SQL statements will be issued to that session's database.
Do iList.$sessionobject.$assign(dbsessionobj)
; Get all the records in the table.
Do iList.$getAllRecords() Returns FlagOK
If FlagOK
; Set the list to be a smartlist.
Do iList.$smartlist.$assign(kTrue)
End If
Quit method FlagOK
The $construct window class method code will run when the window is instantiated, just prior to it becoming visible in the display. - Press F3 to open to the window class editor window.
Add a Complex Grid
We will now add a complex grid field object to the wCountryList window class.
- Press F3 to open the .
- Drag the from the component store to the wCountryList window class.
- With the complex grid component selected in the window class, press F6 to open the
- Set the following properties in the complex grid:
tab
$name - CountryList
$dataname - iList
$left - 10
$top - 10
$height - 200
$width - 150
tab
$columns - 2
$horzscroll - kFalse
$showhorzheader - kFalse
$showvertheader - kFalse
$vertscroll - kTrue
tab
$enterable - kTrue
$extendable - kTrue - Double-click the CountryList complex grid object in the window class to get to the object's methods.
- Right-click CountryList in the treelist > select .
- Name the new method $construct. This field object $constructmethod will run prior to the window class $construct method.
- Enter the following code in the CountryList complex grid's $construct method.
Do $cfield.$edgefloat.$assign(kEFposnClient)
This sets the complex grid object to expand to fill the area of the window class when the window is instantiated. By setting kEFPosnClient in the field object's $construct method you avoid having the component covering the entire window while you are designing the window class. - Close the method editor to return to the window class editor.
- Drag an field object from the into column one of the complex grid.
- With the entry field object selected in the complex grid, set the following entry field properties in the :
tab
$name - CountryName
$dataname - iList.CountryName
tab
$edgefloat - kEFposnClient
$horzscroll - kTrue - Click the icon in the .
- Drag a field object from the into the header section of the complex grid above the CountryName entry field.
- Double-click the label object and enter Country Name as the label text.
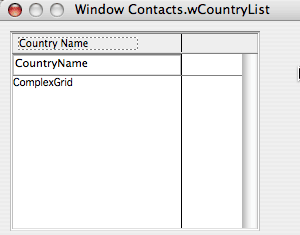

If the complex grid object is selected and you try to select an object inside the complex grid, clicking on the object inside the complex grid fails to select the object. To select an object inside of a complex grid (or any container object such as a tab pane, paged pane, group box, scroll box) hold down the Ctrl/Cmnd key and then click on the object. If you want to select a group of objects inside a container object hold down the Ctrl/Cmnd key and then drag a marquee around the objects.
Add a Save Button
We will now add a scrollbox container object and a pushbutton to the bottom of the window class.
- Click the icon in the toolbar.
- Drag a object from the into the lower area of the window class below the complex grid.
- With the scroll box object selected press F6 to open the and set the following properties.
tab
$name - BottomContainer
$height - 50
tab
$edgefloat - kEFposnBottomToolBar
$fieldstyle - CtrlLabel
$effect - kBorderNone
$horzscroll - kfalse
$vertscroll - kFalse - Drag a object from the into the BottomContainer scrollbox object.
- With the push button object selected press F6 to open the and set the following properties.
tab
$name - Save
$text - Save
$left - 325

- Double-click the Save pushbutton object to get to the object's methods.
- Enter the following code in the $event method of the Save pushbutton object.
On evClick
If #SHIFT
Breakpoint
End If
; Issue a $dowork to save any changes to the smartlist.
Do iList.$dowork() Returns FlagOK
If not(FlagOK)
OK message [sys(85)] (Icon) {Flag false after $dowork}
Else
Do $cinst.$redraw()
End If

I like to include If #SHIFT, Breakpoint, End if just below the On evClick in the $event method of all pushbutton objects. I find this very handy for debugging code. If you want to step through the code, or look inside the window class instance you shift-click on any pushbutton and end up at the Breakpoint. From there you can continue stepping through the code or just look at the ivars and clear the method stack. You can add the If #SHIFT, Breakpoint, End if code to the pushbutton field object in the as follows:
- Right-click anywhere on the window > select .

- > select Component Library library > double-click _Field Components
- Double-click the object to get the object's methods.
- Add the following code to the $event method of the field object.
On evClick
If #SHIFT
Breakpoint
End If
- Close the method editor window.
- While we are in the field components, lets modify the object default properties. Select the field object.
- > tab. Set the following properties:
tab
$fieldstyle - CtrlLabel
$effect - kBorderNone
$horzscroll - kfalse
$vertscroll - kFalse
- Close the window.
- Right-click anywhere on the window > select to uncheck the context menu item.
Test the Window
We are ready to test the wCountryList window class.
- menu > select menu line. All going well an instance of the wCountryList window class will be opened, the $construct method will get all the records from the database, and the records will be listed in the complex grid.
- Change the name of one of the countries in the list by adding some extra letters to the end of the country name.
- Click the button.
- Close and reopen the window. All going well the extra letters you added to the end of the country name will appear in the list.
- Remove the extra letters from the country name.
- Select the last country in the list and press the Tab key. The complex grid should automatically add a new line to the end of the grid.
- Enter a new country name, Germany.
- Click the button.
- Close and reopen the window. All going well Germany will now be included in the list of countries.
Summary
In this section you have learned:
- How to create a window class, and add field components to the window class.
- How to modify components in the component store.
- How to get records and save changes from a window classs using an ivar list variable bound to a table class.
Report Class
In this section we will add a report class for printing a list of countries.Create a Report Class
To create the report class:
- > select Contacts library > click > click .
- Name the report class, rCountryList.
- Select rCountryList, press F8 to go to the class methods.
- > tab > add the following instance variables:
- iList
- List
- iTitle
- Character
- 100 - Select the $construct report class method in the treelist.
- Add the following variables to the tab:
- pfList
- Field Reference
- pTitle
- Character
- 100 - Add the following code to the $construct method:
; Copy the parameters to ivars.
Calculate iList as pfList
Calculate iTitle as pTitle - Close the method editor to return to the
- Double-click rCountryList to open the report class editor.
- Press F6 to open the and set the following report class properties:
tab
$islist - kTrue
$mainlist - iList
tab
$pageheader - kTrue
$totals - kTrue - Click anywhere on the report class editor and then press F3 to open the .
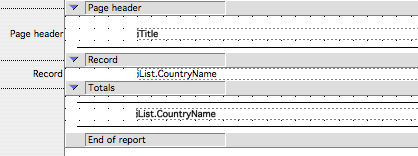
- Drag an field from the component store to the middle line of the section of the report class.
- With the entry field selected in the report class, press F6 to open the
- Set the following properties of the entry field:
tab
$dataname - iTitle
$left - 1
$width - 6
tab
$fontstyle - kBold - Drag another field from the component store to the middle line of the section of the report class.
- With the entry field selected in the report class, press F6 to open the
- Set the following properties of the entry field:
tab
$dataname - iList.CountryName
$left - 1
$width - 6 - Ctrl/Cmnd-click the empty line above the entry field in the section. The line should be hilited to indicate that it is selected.
- Ctrl/Cmnd-click the empty line below the entry field in the section. The line should be hilited to indicate that it is selected.
- Click the button in the report class editor toolbar. The empty line above and below the entry field in the section should be deleted.
- Drag another field from the component store to the middle line of the section of the report class.
- With the entry field selected in the report class, press F6 to open the
- Set the following properties of the entry field:
tab
$dataname - iList.CountryName
$left - 1
$width - 6
$totalmode - kTmCount
tab
$fontstyle - kBold - Click the button in the toolbar.
- Single-click the object in the to select the line drawing tool.
- Draw a horizontal line below the iTitle field in section of the report class. After you have drawn the line object in the report class you can select it and drag the handles at either end of the line to change the line.
- Select the line object in the section of the report class.
- Ctrl/Opt+Drag the line object in the section of the report class to the first line of the section. This should create a copy of the line in the section.
- Ctrl/Opt+Drag the line object in the first line of the section of the report class to the third line of the section. This should create another copy of the line in the section.
- Close the report class editor window.
Add a Print Button
We'll now add a button to the wCountryList window class. The button will be used to print the rCountryList report.
- > select Contacts library > double-click .
- Drag a object from the onto the BottomContainer scrollbox.
- With the pushbutton object selected set the following properties in the .
tab
$name - Print
$text - Print
$left - 25 - Double-click the Print pushbutton object to get to the object's methods.
- Enter the following code in the $event method of the Print pushbutton object.
On evClick
If #SHIFT
Breakpoint
End If
; Set the current report class and report destination.
Begin reversible block
Set report name rCountryList
Send to screen
End reversible block
; Pass this window's list variable and title to the report's $construct method.
Print report {(iList,$cinst.$title)}
Test the Report
We are ready to test the rCountryList report class.
- menu > select menu line.
- Click the button.
- All going well the rCountryList report will be printed to the screen.
Summary
Well that wraps up the tutorial. I hope that this tutorial has helped you gain confidence with using Omnis Studio.
You now have the basics but there's much, much, more to learn! Omnis Studio is a powerful development tool with many more features.
In the tutorial you will continue developing the application which you started in and do the following:
- Add tables to the database for State/Provinces, and Town/Cities. The data in these tables will be linked using foreign keys.
- Create query classes to join the Countries, States, and Towns.
- Create a superclass table class with several subclass tables classes.
- Learn how to generalize superclass methods and create property methods to reduce code duplication and maintenance.
The tutorial is only available to .
The cost of producing these tutorials and maintaing the studiotips.net website needs to be covered. Omnis Studio developers are encouraged to become StudioTips Members. The cost of membership is a one time entrance fee of only US$99 plus an annual membership fee of just US$49/year. A bargain at twice the price! You will receive a return on your investment within the first month of using StudioTips.
When you become a you receive the StudioTips libraries which include loads of code samples and demos, extra utilities, and of course... the additional StudioTips tutorials.
Visit www.studiotips.net to find out more and to become a . Your support is greatly appreciated!
If this tutorial has been helpful to you please send me an email to doug@vencor.ca) It is always encouraging to hear from developers who have benefited from the tutorial. Be sure to include any suggestions for improvements or additional topics you would like to see covered.
Happy coding!
Doug KuyvenhovenVencor Software