Tips_sql > Postgresql > PostgreSQL (All Contents)
PostrgeSQL
This section covers various tips related to setting up and working with PostgreSQL from the perspective of an Omnis Studio programmer. I started using PostgreSQL in 2007 after talking to another Omnis Studio developer who was very happy with PostgreSQL and was using against some sizeable databases. (over a million records in some tables)
I had resisted using PostgreSQL because Omnis Studio did not have a DAM for connecting to PostgreSQL. That changed with Omnis Studio version 4.3 so I figured it was worth a try. The claim for PostgreSQL as opposed to MySQL is that PG was built from the ground up with all the features and then tuned for performance later on, whereas the MySQL was built for speed and then the features (transactions, stored procedures, etc.) were added afterwards.
With the files and instructions from another Omnis Studio developer (Dave McKeone of Artsman) I installed and on my MacBook Pro laptop in less than 15 minutes. It would have taken me many hours of struggling and searching for answers using Google to get it right on my own. If you want to install PoistgreSQL on a Mac, see the topic on .Installing PostgreSQL on Mac OS X
This section covers the steps involved with installing and configuring PostgreSQL on Mac OS X.
Thanks to Dave McKeone from the good guys at Artsman for providing this information.Add postgres User
Before installing PostgresSQL you should add a postgres user to your computer's accounts. The installer will install one for you, but then you will have difficulty setting or changing the postgres user password.
- >
- Click the button below the list of users.
- Enter the user name and short name as postgres
- Enter a password that you won't forget or be sure to mark it down somewhere.
- Mac OS X 10.5 Make sure the type is set to
Mac OS X 10.4 Uncheck the checkbox - Click the button.
- Close the window.
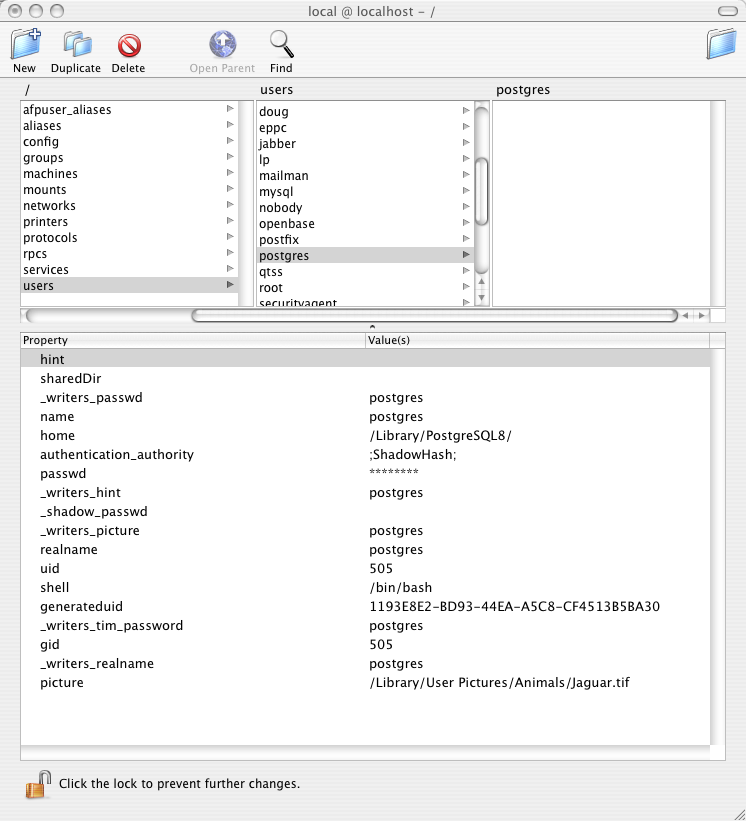
After adding the postgres user, check the NetInfo settings as follows:
- Open the application.

From the press Shift+Cmnd+U to get to the Utilities folder.
If you are in column view, press the left arrow key, then type n to scroll down to NetInfo Manager, then press Cmnd+down arrow to open the application.) - Select users in the middle pane.
- Select postgres in the following pane.
- Check the following values in the lower pane to make sure they match. Change them if they don't.
home - /Users/postgres or /Library/PostgreSQL8
shell - bin/bash - Quit when you are done.
Install PostgreSQL and pgAdmin
Get the following files off the internet and install them on your Mac OS X computer. (As of PostgreSQL 8)
- PostgreSQL_8...-Unified.dmg - Go to www.postgresqlformac.com
- Double click the dmg and follow the installation instructions to install PG on your Mac OS X computer.
- pgadmin3...-rc1.dmg - Go to www.pgadmin.org
- Double click the dmg and drag the pgAdmin3.app file to the Applications folder on your Mac OS X computer.
Setup Bash Profile
You need to set up a .bash_profile file as follows:
- Open the application.
- Switch to the user. Type su - postgres
- You will be prompted to enter the password.
- The terminal prompt should now end with postgres$
- Type pico ~/.bash_profile
- Enter the following text.
export PATH=/Library/PostgreSQL8/bin:$PATH
export PGDATA=/Library/PostgreSQL8/data
PostgreSQL8 in the above text might be something different depending on the version you installed. Check on your computer in the HardDrive/Library/ folder to verify the name of your installed PostgreSQL folder. - Press Ctrl+x to Exit. Press y to save the changes. Press the Return key to save the file.
- Type exit in the to return to the normal user.
This file sets up the paths to make it easier to run your PG commands from the terminal.
Setup Shared Memory Settings
You need to change the Shared Memory Settings. This is done so that you can increase the shared_buffers parameter to greater than the standard 8MB. Shared buffers allow PostgreSQL to use much more memory and can improve performance quite dramatically.
Set up a sysctl.conf file as follows:
- Open the application.
- Go to the /etc directory. Enter cd /etc
- Create/edit the file as the super user. Enter: sudo pico /etc/sysctl.conf
- You will be prompted to enter the super user password.
- Enter the following text in the file.
kern.sysv.shmmax=524288000
kern.sysv.shmmin=1
kern.sysv.shmmni=64
kern.sysv.shmseg=16
kern.sysv.semmns=130
kern.sysv.shmall=131072000
kern.sysv.maxproc=2048
kern.maxprocperuid=512

shmmax is the key setting; it is in bytes. The value in this example is 500MB. If the machine has more memory to use, then this should be increased as well. shmall is the shmmax setting divided by 4.
1 MB = 1048576 bytes - Exit and save the file. (Ctrl+X, y, Return)
PostgreSQL Access Settings
This file controls all access to the PostgreSQL server. In order for clients to connect to the server their IP address must be in the allowed list of users. The two common methods that you will see being used are md5 and trust. Md5 does md5 password authentication and should be used for just about all entries to this file. Trust allows clients to connect without password authentication, the only entry trust should ever have is for the local server machine.
- Open the application.
- Type su - postgres
- Type pico /Library/PostgreSQL8/data/pg_hba.conf
- Press Ctrl+v to scroll down a page at a time to the end of the file.
- Add/Modify the lines to match your settings. trust indicates that the machine can change passwords.
Here is an example of the access settings section in the file:
# TYPE DATABASE USER CIDR-ADDRESS METHOD
# "local" is for Unix domain socket connections only
local all all trust
# IPv4 local connections:
host all all 127.0.0.1/32 trust
host all all 192.168.1.0/24 md5
# IPv6 local connections:
host all all ::1/128 trust - Exit and save the file. (Ctrl+X, y, Return)
NOTE:The CIDR address as noted above has many combinations. Here is an example of the common one's you will see:
192.168.150.50 = 192.168.150.50/32
192.168.150.XXX = 192.168.150.0/24
192.168.XXX.XXX = 192.168.0.0/16
192.XXX.XXX.XXX = 192.0.0.0/8
XXX.XXX.XXX.XXX = 0.0.0.0/0 (This allows everything... probably should never use that)
PostgreSQL Configuration Settings
- Open the application.
- Type su - postgres
- Type pico /Library/PostgreSQL8/data/postgresql.conf
- Ctrl+v to scroll down the file. Ctrl+y to scroll up.
- Edit the property variable as needed.
On OS X parameters that have a # character in front of them are considered not in use. If a parameter that is required has one of these in front, remove the # character before change the setting.
- Exit and save the file. (Ctrl+X, y, Return)
The following are common properties you may want to verify/change:
- listen_addresses - This value should always = '*'
- shared_buffers - This value should be 20-25% of the systems total RAM.
- temp_buffers - This value should be 50 MB for machines with 2GB of RAM or more and 20 MB for those with less
- work_mem - This value should be 50 MB for machines with 1GB of RAM or more and 20 MB for those with less
- maintenance_work_mem - This value should be 50 MB for machines with 1 GB of RAM or more and 20 MB for those with less
- effective_cache_size - This value should be roughly the amount of free ram(always round down to the nearest 50 MB) as seen in the or without PostgreSQL running. Good to take the reading before installing PostgreSQL.
- redirect_stderr - this value should be set to on
- log_directory - this value should be set to 'pg_log'
- log_filename - this value should be set to 'postgresql-%Y-%m-%d_%H%M%S.log
- log_rotation_age - this value should be set to 7d
- stats_start_collector - this value should be set to on
- stats_block_level - this value should be set to on
- stats_row_level - this value should be set to on
- autovacuum - this value should be set to on
1 MB = 1048576 bytes
Starting/Stoppping the Database Server
I recommend that you stop and start the PostgreSQL database server once you've got all the configuration stuff done. If there are any errors in starting the server it will be reported to you and you can solve the problem before you go any further.
To stop and start the server from the command line:
- Open the
- Type su - postgres
- Type pg_ctl start or pg_ctl stop or pg_ctl restart
- Optional - Leave the terminal window open to view stderr log messages as you execute queries against the server.
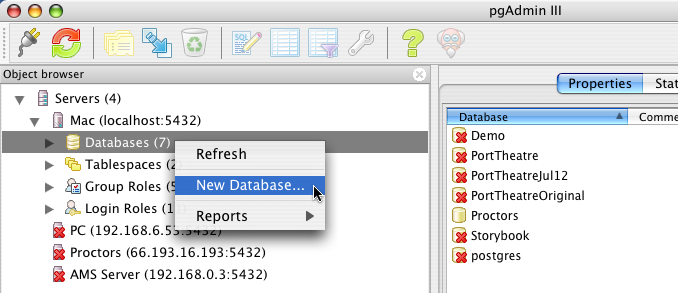
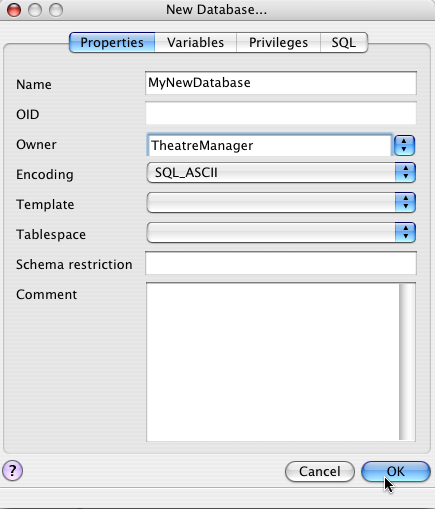
Creating a Database
Use the pgAdmin tool to create new databases.
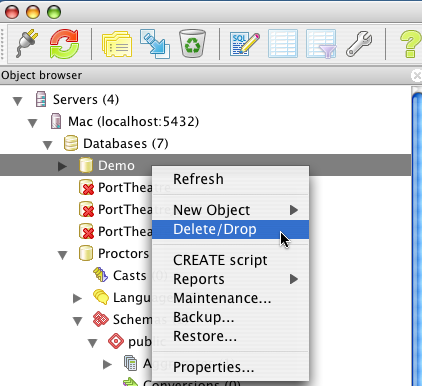
Drop a Database
Use the pgAdmin tool to drop a database.
Backup up a Database
To backup a database from the command line on Mac OS X:
- Open the
- Type su - postgres
- You can either do an uncompressed backup or a compressed backup
- Uncompressed - Type pg_dump -U postgres -o [DatabaseName] > [Path]
- Compressed - Type pg_dump -U postgres -o -F c -Z 9 [DatabaseName] > [Path]
[Database] is replaced with the database name.
[Path] is the path where you want to backup to go including the file name and extension.
For uncompressed use the file extension .sql
For compressed use the file extension .backup
Compressed backup example for the database 'Demo' as follows:
e.g For Database 'Demo' -> pg_dump -U postgres -o Demo > /Users/Shared/MyBackups/Demo.sql
pg_dump -U postgres -o -F c -Z 9 Demo > /Users/Shared/MyBackups/Demo.backup
Restoring a Database
To backup a database from the command line on Mac OS X:
- Open the
- Type su - postgres
- You can either do an uncompressed backup or a compressed backup
- Drop the existing database if it exists.
- Create a new database with the same name
- Depending on whether you are restoring from an uncompressed backup or a compressed backup do one of the following:
- Uncompressed - Type: psql [DatabaseName] < [Path]
- Compressed - Type: pg_restore -d [DatabaseName] [Path]
[Database] is replaced with the database name.
[Path] is the path where you want to backup to go including the file name and extension.
Uncompressed:
e.g For Database 'Demo' -> psql Demo < /Users/Shared/MyBackups/Demo.sql
e.g. For Database 'Demo' -> pg_restore -d Demo /Users/Shared/MyBackups/Demo.backup
Installing PostgreSQL on Windows
This section covers the steps involved with installing and configuring PostgreSQL on Mac OS X.
I have not installed PostgreSQL on Windows... so I can't give you directions. If you have the steps documented please email them to me. doug@vencor.ca