Menus
This section contains various miscellaneous topics relating to menus.Application Menus
Application menus are located across the top of the screen or window in which the Omnis Studio application is running.
On the Mac the application window is not resizeable so the application menus are always across the top of the full screen.
On Windows, applications run inside of a resizeable application window. The application menus are the menus across the top of the outer window which the instance of Omnis Studio is running inside of.
From Omnis Studio you can install, remove, and replace application menus. For example, based on the top window, you could add or remove a menu and include only the reports that would be applicable to the current top window. This can be achieved automatically if you use a different task for each window instance.
If am not a fan of changing the application menus because users can get confused if menus appear and disappear or the menu items change.
My preference in Omnis Studio has been to use window menus for any menus that are sensitive to the context of the window which is on top. I have found this approach to be simpler for the developer and for the users.
The application menus are found in the $imenus group. You can use notation to loop through the $imenus group as follows:
; Make a list of the menu instances group menus.
Do $imenus.$makelist($ref().$name) Returns List
OK message (Icon) {There are current [List.$colcount] non-standard menus installed.////About to loop through the menu names.}
; Loop through the $imenus group.
Do $imenus.$first() Returns rMenu
While rMenu
OK message (Icon) {Installed menu name: [rMenu().$name]}
Do $imenus.$next(rMenu) Returns rMenu
End While
Quit method kTrue
Standard Application Menus
Omnis Studio automatically installs a number of standard menus with a runtime version. ()
You can remove or replace and of the standard menus using OM commands.
Remove menu *Window
Remove menu *Help
Replace standard Edit menu {mCustomEditMenu/Edit}
Window Menus
Window menus are located at the top of a window directly below the title bar.
I prefer to use window menus because they allow me to construct menus that are specific to the context of the window and stay with the window. If the user moves the window around on the screen, moves it to the back, or minimizes it, and then later on moves it to the front or maximizes it, the window menus are always there travelling with the window.
You can add a menu to a window class in design mode as follows:
- Set the $hasmenus window class property to kTrue
- Enter the menu class name(s) in a CSV string in the $menumames property.
You can add also a menu instance to a window instance's $menus group using notation.
; Set a reference to the window instance.
Set reference rWin to $cinst
; Set a reference to the menu class.
Do $clib.$menus.$findname('wWindowMenu') Returns rClass
If rClass
; Make sure the $hasmenus property is set to true.
If rWin.$hasmenus=kFalse
Do rWin.$hasmenus.$assign(kTrue)
End If
; Add the menu to the current window instance.
Do rWin.$menus.$add(rClass) Returns rMenu
End If
Quit method kTrue

You can not add the same menu class twice to the same window instance. Each window menu must be from a different menu class.
Cascading Menus
Cascading menus are also known as hierarchical menus.
To add a cascading menu, mMenuChild, to mParentMenu, you add a menu line to mParentMenu and set the $cascade property of that line to mMenuChild.
There are a few gotchas which I ran into with cascading menus.
- Menu Instances - If you use the same cascading menu in different task instances they will all be in the task instance of the task where the child menu was first instantiated.
The solution is to add the suffix /* after the cascading menu name in the $cascade property of the parent menu, (e.g. mMenuChild/*) this causes Omnis Studio to generate a new instance of the menu. The new instance will be within the same task as the parent menu. You can specify the instance name by replacing /* with "/InstanceName"
I always include the /* suffix in the $cascade property. - Menu Communication - The child menu is instantiated before the parent menu, therefore the child will not know who its parent is. The parent can find its child. (Thank goodness!) Each cascading menu line in the parent menu has a $menuinst property. This property gives you a reference to the child menu.
From the parent menu you could register the parent menu with the child menu passing the parent instance reference to the child menu. The child could store the reference to the parent menu in an ivar and then report events to the parent menu. The observer design pattern works great for setting this up. - Crashes - Debugging a menu class which has been instantiated and has cascading menus causes Studio to crash. Not always but quite a few times for me. While building the demo I got into the habit of first removing the menu instance, then editing the menu class methods, then reinstalling the menu instance.
Demonstration
A parent menu mCascadingParent has been created. It has numerous cascading menu lines.
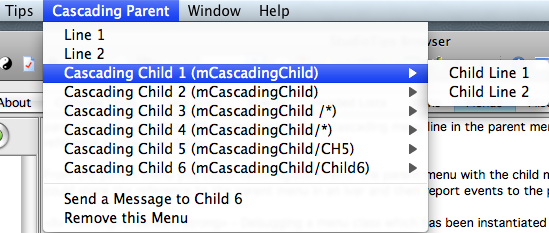
Each of the cascading menu lines has the $cascade property set to mCascadingChild. The first 2 cascading menu lines do not have a /* suffix and therefore are both the same instance.
OK messages in the $construct methods of mCascadingParent and mCascadingChild show you that the child menus are instantiated before the parent menu. If you watch closely, you will also see that there is an OK message for , but not for . This is because and do not include a /* suffix in their $cascade property. and share the same instance... not something you would normally do on the same menu.
If you look at the menu instance in the and select a cascading menu line, then press you will see there is a $menuinst property.
By using the $menuinst property you can communicate from the parent menu to a child menu. The $menuinst property can be used to set 2 way communication between the parent and child menu.
From the parent menu we could send a message to a cascading menu instance.
Do $cinst.$objs.CascadingMenuLine.$menuinst().$IamYourParent($cinst)
In the child menu method: $IamYourParent(pfrParentInst)
Set reference irParent to pParentInst.$ref
Do irParent.$IamYourChild($cinst)
In the parent menu method: $IamYourChild(pfrChildInst)
OK message ('Hello son')
You can use the observer design pattern to attach the parent to the child as an observer of child events. The parent would then automatically be notified whenever a child menu item has been selected by the user.
Press the Run Demo button in the to try out a cascading menus demo. A menu named will be installed in the application menus. Several child menus are instantiated. Okay messages tell you what is happening as the menus are instantiated. After the menu is instantiated try out the various menu items of the menu.Disable Auto-Create Menu Shortcut Keys
One feature of the Omnis Studio IDE that has irritated me is the auto-creation of shortcut keys in the menu design window.
If you have a menu item selected in the menu design window and then press F6 to open the Property Manager ... lookout! ... you just assigned the $macshortcutkey, $winshortcutkey, and $unixshortcutkey properties to the selected menu item and to add insult to injury the never even opened up.
To get rid of the accidentally assigned shortcut keys you know have to open the Property Manager using the menu > and go to these 3 properties, click on each one to open a dialog window, click the button, then click the button.
Fortunately, Omnis Studio has provided a solution! You can disable this feature.
- Right-click on the menu editor window and select to uncheck the menu item.
- Right-click and select to permanently uncheck .