Tips_gui > Menus > Menus (All Contents)
Menus
This section contains various miscellaneous topics relating to menus.Application Menus
Application menus are located across the top of the screen or window in which the Omnis Studio application is running.
On the Mac the application window is not resizeable so the application menus are always across the top of the full screen.
On Windows, applications run inside of a resizeable application window. The application menus are the menus across the top of the outer window which the instance of Omnis Studio is running inside of.
From Omnis Studio you can install, remove, and replace application menus. For example, based on the top window, you could add or remove a menu and include only the reports that would be applicable to the current top window. This can be achieved automatically if you use a different task for each window instance.
If am not a fan of changing the application menus because users can get confused if menus appear and disappear or the menu items change.
My preference in Omnis Studio has been to use window menus for any menus that are sensitive to the context of the window which is on top. I have found this approach to be simpler for the developer and for the users.
The application menus are found in the $imenus group. You can use notation to loop through the $imenus group as follows:
; Make a list of the menu instances group menus.
Do $imenus.$makelist($ref().$name) Returns List
OK message (Icon) {There are current [List.$colcount] non-standard menus installed.////About to loop through the menu names.}
; Loop through the $imenus group.
Do $imenus.$first() Returns rMenu
While rMenu
OK message (Icon) {Installed menu name: [rMenu().$name]}
Do $imenus.$next(rMenu) Returns rMenu
End While
Quit method kTrue
Standard Application Menus
Omnis Studio automatically installs a number of standard menus with a runtime version. ()
You can remove or replace and of the standard menus using OM commands.
Remove menu *Window
Remove menu *Help
Replace standard Edit menu {mCustomEditMenu/Edit}
Window Menus
Window menus are located at the top of a window directly below the title bar.
I prefer to use window menus because they allow me to construct menus that are specific to the context of the window and stay with the window. If the user moves the window around on the screen, moves it to the back, or minimizes it, and then later on moves it to the front or maximizes it, the window menus are always there travelling with the window.
You can add a menu to a window class in design mode as follows:
- Set the $hasmenus window class property to kTrue
- Enter the menu class name(s) in a CSV string in the $menumames property.
You can add also a menu instance to a window instance's $menus group using notation.
; Set a reference to the window instance.
Set reference rWin to $cinst
; Set a reference to the menu class.
Do $clib.$menus.$findname('wWindowMenu') Returns rClass
If rClass
; Make sure the $hasmenus property is set to true.
If rWin.$hasmenus=kFalse
Do rWin.$hasmenus.$assign(kTrue)
End If
; Add the menu to the current window instance.
Do rWin.$menus.$add(rClass) Returns rMenu
End If
Quit method kTrue

You can not add the same menu class twice to the same window instance. Each window menu must be from a different menu class.
Cascading Menus
Cascading menus are also known as hierarchical menus.
To add a cascading menu, mMenuChild, to mParentMenu, you add a menu line to mParentMenu and set the $cascade property of that line to mMenuChild.
There are a few gotchas which I ran into with cascading menus.
- Menu Instances - If you use the same cascading menu in different task instances they will all be in the task instance of the task where the child menu was first instantiated.
The solution is to add the suffix /* after the cascading menu name in the $cascade property of the parent menu, (e.g. mMenuChild/*) this causes Omnis Studio to generate a new instance of the menu. The new instance will be within the same task as the parent menu. You can specify the instance name by replacing /* with "/InstanceName"
I always include the /* suffix in the $cascade property. - Menu Communication - The child menu is instantiated before the parent menu, therefore the child will not know who its parent is. The parent can find its child. (Thank goodness!) Each cascading menu line in the parent menu has a $menuinst property. This property gives you a reference to the child menu.
From the parent menu you could register the parent menu with the child menu passing the parent instance reference to the child menu. The child could store the reference to the parent menu in an ivar and then report events to the parent menu. The observer design pattern works great for setting this up. - Crashes - Debugging a menu class which has been instantiated and has cascading menus causes Studio to crash. Not always but quite a few times for me. While building the demo I got into the habit of first removing the menu instance, then editing the menu class methods, then reinstalling the menu instance.
Demonstration
A parent menu mCascadingParent has been created. It has numerous cascading menu lines.
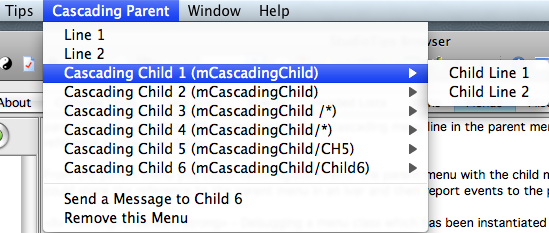
Each of the cascading menu lines has the $cascade property set to mCascadingChild. The first 2 cascading menu lines do not have a /* suffix and therefore are both the same instance.
OK messages in the $construct methods of mCascadingParent and mCascadingChild show you that the child menus are instantiated before the parent menu. If you watch closely, you will also see that there is an OK message for , but not for . This is because and do not include a /* suffix in their $cascade property. and share the same instance... not something you would normally do on the same menu.
If you look at the menu instance in the and select a cascading menu line, then press you will see there is a $menuinst property.
By using the $menuinst property you can communicate from the parent menu to a child menu. The $menuinst property can be used to set 2 way communication between the parent and child menu.
From the parent menu we could send a message to a cascading menu instance.
Do $cinst.$objs.CascadingMenuLine.$menuinst().$IamYourParent($cinst)
In the child menu method: $IamYourParent(pfrParentInst)
Set reference irParent to pParentInst.$ref
Do irParent.$IamYourChild($cinst)
In the parent menu method: $IamYourChild(pfrChildInst)
OK message ('Hello son')
You can use the observer design pattern to attach the parent to the child as an observer of child events. The parent would then automatically be notified whenever a child menu item has been selected by the user.
Press the Run Demo button in the to try out a cascading menus demo. A menu named will be installed in the application menus. Several child menus are instantiated. Okay messages tell you what is happening as the menus are instantiated. After the menu is instantiated try out the various menu items of the menu.Disable Auto-Create Menu Shortcut Keys
One feature of the Omnis Studio IDE that has irritated me is the auto-creation of shortcut keys in the menu design window.
If you have a menu item selected in the menu design window and then press F6 to open the Property Manager ... lookout! ... you just assigned the $macshortcutkey, $winshortcutkey, and $unixshortcutkey properties to the selected menu item and to add insult to injury the never even opened up.
To get rid of the accidentally assigned shortcut keys you know have to open the Property Manager using the menu > and go to these 3 properties, click on each one to open a dialog window, click the button, then click the button.
Fortunately, Omnis Studio has provided a solution! You can disable this feature.
- Right-click on the menu editor window and select to uncheck the menu item.
- Right-click and select to permanently uncheck .
Menus Notation
This section covers examples of notation for various methods dealing with menus.Install Menu
You can use $open or $openonce to install a menu in the application menu bar.
; Open an instance of the menu class in the application menus.
Do $libs.LibName.$menus.MenuName.$open() Returns rMenu
; Open once an instance of the menu class in the application menus.
Do $libs.LibName.$menus.MenuName.$openonce() Returns rMenu
; Add a window menu to a window instance.
Do rWin.$hasmenus.$assign(kTrue)
Do rWin.$menus.$add($lib.LibName.$menus.MenuName) Returns rMenu
Set Menu Title
Use the $title property to set the menu title.
Do rMenu.$title.$assign('NewTitle') Returns rMenu
Disable/Enable Menu
Use the $enabled property to enable/disable a menu.
; Enable a menu.
Do rMenu.$enabled.$assign(kTrue)
; Disable a menu.
Do rMenu.$enabled.$assign(kFalse)
Remove Menu
You can use $close to remove a menu from the application menu bar or a window menu bar.
; Close the referenced menu instance.
Do rMenu.$close()
Add Menu Item
A menu line is considered an object of the menu instance.
; Add a menu line object.
; $add(cText[,bEnable=kFalse,bCheck=kFalse])
Do rMenu.$objs.$add(Text,kTrue) Returns rLine
Disable/Enable Menu Item
Use the $enabled property to enable/disable a menu line.
; Disable the referenced menu line.
Do rLine.$enabled.$assign(kFalse)
; Enable the referenced menu line.
Do rLine.$enabled.$assign(kTrue)
Remove Menu Item
To remove a menu using notation you need a reference to the menu instance, and you need a reference to the menu item. You can then use the $remove method to remove the menu item.
Set a reference to the menu by using $findname in the menu instances group.
Do $imenus.$findname('MENUNAME') Returns rMenu
Set a reference to the menu item by using $findname in the menu items group.
Do rMenu.$objs.$findname('MENUITEMNAME') Returns rMenuItem
Do rMenu.$objs.$remove(rMenuItem)
Shortcut Keys
To assign a shortcut key combination to a menu using notation you must use the k constant equivalents for the special keys applicable to the platform.
The key equivalents can be found in the > Tab >
; Set the menu line shortcut to the function key F5.
Do rLine.$macshortcutkey.$assign(5)
Do rLine.$winshortcutkey.$assign(5)
Do rLine.$unixshortcutkey.$assign(5)
; Set the referenced menu line to the shortcut key combination Ctrl/Cmnd+Shift+P
Do rLine.$macshortcutkey.$assign(kCommand+kShift+asc('P',1))
Do rLine.$winshortcutkey.$assign(kControl+kShift+asc('P',1))
Do rLine.$unixshortcutkey.$assign(kControl+kShift+asc('P',1))
The constants kControl and kCommand are the same value.
The constants kAlt and kOption are the same value.
On the Mac platform the key can be used as an additonal modifier key, but not on its own.
On the Win platform the key can be used on its own, but not as an additional modifier.
Cmnd+Opt+K - can be used on the Mac plaform.
Ctrl+Alt+K - can not be used on the Win platform.
Alt+K can be used on the Win platform.
Opt+K can not be used on the Mac platform.
For cross-platform compatabilty use the modifier keys kControl or kControl+kShift. That way you can use the same value for all 3 platforms.
; Set the referenced menu line to the shortcut key combination Ctrl/Cmnd+K
Calculate ShortCutKey as kControl+asc('K',1)
Do rLine.$macshortcutkey.$assign(ShortCutKey)
Do rLine.$winshortcutkey.$assign(ShortCutKey)
Do rLine.$unixshortcutkey.$assign(ShortCutKey)
; Set the referenced menu line to the shortcut key combination Ctrl/Cmnd+Shift+K
Calculate ShortCutKey as kControl+kShift+asc('K',1)
Do rLine.$macshortcutkey.$assign(ShortCutKey)
Do rLine.$winshortcutkey.$assign(ShortCutKey)
Do rLine.$unixshortcutkey.$assign(ShortCutKey)
Context Menus
Context menus are great for adding optional commands and features to your application. They are especially appreciated by power users who are more familiar with your application.
Rather than cluttering up the window with too many buttons, use context menus. (Right-click on this field in the to see its context menu.)
If a window object supports context menus it will have a $contextmenu property. If you enter a valid menu class name in the $contextmenu property, the menu class will be opened if the user right-clicks on the window object.
Creating and maintaining a menu class for each context menu is a lot of work. A solution is to create all your context menus on-the-fly. This section explains how you can build a context menu on-the-fly.
A user interface problem with context menus is how do you communicate to the user that a context menu is available to them for certain window objects? See the topic for a technique to hint the user when a context menu exists.Context Menu On-The-Fly
When the user right-clicks on a window object which has a $contextmenu a $event message is sent to the window object, pEventCode is set to evOpenContextMenu, and pContextMenu is reference to the menu instance which is about to appear to the user as a context menu.
By creating a menu class with no menu lines and adding a couple of public methods to the menu class we are able to very easily create context menus on-the-fly.
Because the menu lines are added to the menu instance we never have to make change to the menu class. A single menu class can be use for all of the context menus in an application.
If you have StudioTips a copy of the context menu and a demo is included in the StudioTips library. You are free to copy the menu class to your own applications.
The following topics explain the methods and code involved in creating context menus on-the-fly.Context Menu Class
You will need to create a menu class with a few basic methods. For this discussion the menu class is named mContextMenu.
There are no menu lines and the menu title is left empty. We just need to add the following class methods to mContextMenu.
The following class methods are added to mContextMenu.
- $addMenuLine(pName,pText,pbElipsis) - This method is called from the window object method which the user right-clicks on. An $addMenuLine message is sent for each line you want to add to the context menu. pName is assigned to the $name property of the menu line. pText is assigned to the $text property and is visible to the user. pbElipsis appends to the visible text. The method returns a reference to the menu line. The sender can further manipulate the menu line using the menu line reference.
- $attachEventsObserver(prObserver,pCallBackMethodName) - This method is called from the window object method which the user right-clicks on. It tells the menu instance where to send the call back message and the public method name of the call back message after the user selects a line in the context menu. The $name property of the the menu line is included as the first parameter of the call back message.
- $control - This method is notified when the user selects a line in the context menu. The $control method sends the observer the call back method message and includes the $name of the menu line selected by the user as the first parameter in the call back message, and a reference to the selected menu as a second parameter.
Sample code for each of the context menu class methods is as follows:
- $addMenuLine(pName,pText,pbElipsis)
; $addMenuLine(pName,pText,pbElipsis)
; Append ... to the pText if pbElipsis is set to true. Default is false.
Calculate Text as con(pText,pick(pbElipsis=1,'','...'))
; Add a menu line object to the menu instance.
; $add(cText,bEnabled,bChecked)
Do $cinst.$objs.$add(Text,kTrue,kFalse) Returns rMenuLine
; Assign the name to the menu item.
Do rMenuLine.$name.$assign(pName)
; Return a reference to the added menu item.
Quit method rMenuLine - $attachEventsObserver(prObserver,pCallBackMethodName)
; $attachEventsObserver(pfrObserver,pCallBackMethod)
; Store a reference to the the observer. Could be a window object or a window class instance.
Set reference irObserver to pfrObserver.$ref
; Store the call back method name.
Calculate iCallBackMethod as pCallBackMethod
Quit method kTrue - $control
; $control
; The $control method is automatically called if the user selects a menu line.
; Send a call back message to the observer. Include the name of the selected menu line name as the first parameter.
Do irObserver.[iCallBackMethod]($cobj().$name)
Quit method kTrue
Context Menu Window Object
The window object (field) which you want to add a context menu to must have the $contextmenu property set to the name of the context menu you want to instantiate. e.g. mContextMenu. If the menu class is in another library you would need to prefix the menu class name with the library name.
When the user right-clicks on the window object Omnis Studio sends a $event message to the window object. You need to trap On evOpenContextMenu in the $event method of the window object, attach the window object (or window class) as an observer, and then add menu line(s) to the context menu instance. Sample code is as follows:
; $event method of a window object. Automatically called when the user right-clicks on the field.
On evOpenContextMenu
; Add this field as an observer to be notified if the user selects a context menu line.
; Note: Sending $cinst as the observer would result in the call back message being sent to the window class method.
Calculate CallBackMethod as '$eventContextMenuLineSelected'
Do pContextMenu.$attachEventsObserver($cobj,CallBackMethod)
; Add menu lines to the context menu.
Do pContextMenu.$addMenuLine('pingMe','Send Test Ping Message')
Do pContextMenu.$addMenuLine() ;; Empty line.
Do pContextMenu.$addMenuLine('helloWorld',"Hello World",kTrue)
You also need to add the specified call back method to the window object. Sample code is as follows:
; $eventContextMenuLineSelected(pName)
; This method is called by the $control method of the context menu if the user selected a line in the context menu.
Switch low(pName)
Case 'pingMe'
OK message [sys(85)] (Icon) {Ping message received.}
Case 'helloworld'
OK message [sys(85)] (Icon) {Hello World!}
Default
OK message [sys(85)] (Icon) {Error. Switch/case not set up for [pName]}
End Switch
Quit method kTrue
That's all there is to it! I use this technique in all of my applications and love it. Just one menu class for an infinite number of context menu. All context menu lines are added on-the-fly. You can include If/Else logic if in your $event method to include/exclude menu lines based on the state of the window or the current user.
Press the button in the to try out a context menu on-the-fly demo.Sequence of Events
The summary of context menu on-the-fly events as they occur are as follows:
- The user right-clicks on the field.
- Omnis Studio opens an instance of mContextMenu. The instance is not yet visible to the user.
- Omnis Studio sends a $event message is sent to the window object (field).
- The $event method sends an $addEventsObserver($cfield,'$eventContextMenuLineSelected') message to the invisible instance of mContextMenu.
- mContextMenu sets the window object as the observer to receive a call message if the user selects a line in the context menu instance.
- The $event method sends a series of $addMenuLine(pName,pText,pbElipsis) messages to invisible instance of mContextMenu.
- mContextMenu adds thbe specified menu lines.
- Omnis Studio makes the context menu instance visible to the user.
- The user selected the menu line .
- Omnis Studio sends an $event message to the selected menu line.
- Since the menu line was added using notation it doesn't have an $event method Omnis Studio automatically passes the message to the $control method of the context menu instance.
- The $control method notify the events observer by sending an $eventContextMenuLineSelected($cobj().$name) message to the window object.
- The window object (field) receives the $eventContextMenuLineSelected message and based on pName takes the appropriate action.
Context Menu Cursors
One of the pitfalls of context menus is that the user might not realize a context menu exists.
How do you communicate the presence of a context menu to the user? You could add an audio message that says: Hey, this object has a context menu which you can use!, but that might get annoying to the user. Rephrase - that would be annoying.
You could add a tooltip to the field which says: Right-click for more options". The would still be annoying to the user, just less annoying.
The solution which I use it so change the cursor to a context menu cursor icon when the mouse passes over any field which has a context menu.
This is accomplished by setting the $cursor property of the field whenever you set to $contextmenu of the field.
I use one type of context menu cursor for text entry fields and another for non-text entry fields.
Omnis Studio doesn't include any context menu cursor icons so I created then in the icons editor. They are included with StudioTips. One is an I-bar style cursor for text entry fields, and the other is an arrow style cursor for non-text entry fields. The context menu of the cursor icon is blue so the user can notice it is different than the standard black MacOS context menu cursor.
Press the button in the window to see what the context menu cursors look like.
The icons are stored in the #ICONS class of the tipsDocs library which is included with StudioTips. The cursors are located on the page. For information on copying icons from one library to another refer to the Omnis Studio documentation.Menus On-The-Fly
When I wrote my first Omnis Studio application each menu was built using the menu class editor. Each menu line was added to a menu class and code was put behind the menu item to carry out the requested action.
Later I learned how to build menus on-the-fly and discovered the following advantages to them:
- You avoid spending time manually adding menu items to menu classes.
- Your menus are flexible and easier to maintain.
The following example may help to explain how using menus on-the-fly makes application development easier.
You have a window menu called and a user asks you to add a new report called . With menus on-the-fly, you simply go to the $constructMenus method, add one line of code, then go to the observer of the menu events and add a $BackOrderedItems method, write the code to print the report, and you're done! You never need to touch the menu class.
If you are supporting a multi-language application, menus on-the-fly are a great benefit because the menu text is assigned at runtime.
If you have already read the topic you will find this section is similar with just a few differences.
All the methods needed to create menus on-the-fly are listed in this section.
Press the button in the to open a demo window.
Menus on-the-fly are a great way to write flexible and easy to maintain applications!$constructMenus - Window Method
In the window class a special method, $constructMenus, is called by $construct when the window instance is constructed. The $constructMenus method is responsible for adding menus to the window and adding menu lines to the menus.
The sample code below is in the $constructMenus method of the demo window.
; Make sure $hasmenus is set to true.
Do $cinst.$hasmenus.$assign(kTrue)
; Add the demo menu to the $menus group of the window instance.
Do $cinst.$menus.$add('mMenusOnTheFlyDemo') Returns rMenu
; Set the menu title.
Do rMenu.$title.$assign('Reports')
; Attach this window instance as an "events observer" to be notified of any menu events.
; The second parameter is the 'dispatcher' call back method name.
Do rMenu.$attachEventsObserver($cinst,'$doReportsMenuCmnd')
; Add some menu lines to the menu.
Do rMenu.$addMenuLine('Report1','Report 1') Returns rLine
Do rMenu.$addMenuLine() ;; Empty line.
Do rMenu.$addMenuLine('Report2','Report 2',kTrue) Returns rLine
Do rMenu.$addMenuLine('NoRecipientMethod','No Recipient Method',kTrue) Returns rLine
Quit method kTrue
$doMenuCmnd - Window Method
The $doMenuCmnd window class method is the dispatcher for all messages received from the menus to which the window class has attached itself as an events observer. You can use the same dispatcher method for multiple menus.
The $doMenuCmnd method prefixes a $ character the selected menu line's $name and checks for a recipient class method using $cando. If the method is available $doMenuCmnd forwards the message to the method.
The sample code below is in the $doMenuCmnd method of the demo window.
; This method forwards to reports menu message to a public method matching the name of the menu line selected.
; Calculate the public method name based on the selected menu line name.
Calculate MethodName as con('$',pfrMenuLine().$name)
; Test to make sure the method name exists.
If $cinst.[MethodName].$cando
OK message [sys(85)] (Icon) {The event message has been received by the dispatcher method [$cmethod().$name]////Parameter 1 is a reference to the menu line '[pfrMenuLine().$name]'////This message is about to be forwarded to the [MethodName] window class method.}
Do $cinst.[MethodName](pfrMenuLine) Returns FlagOK
Else
OK message [sys(85)] (Icon) {Error!////The window class method '[MethodName]' could not be found.////Unable to dispatch the request.}
Calculate FlagOK as kFalse
End If
Quit method FlagOK
$attachEventsObserver - Menu Method
The demo menu only allows a single events observer per menu class instance. You could allow for multiple observers by storing the observer references in one row ivar, and the call back method names in another row variable. See the topic for more information.
; $attachEventsObserver(pfrObserver,pCallBackMethodName)
; Store a reference to the observer instance.
Set reference irObserver to pfrObserver.$ref
; Store the 'Dispatcher' method. (Optional)
Calculate iCallBackMethodName as pCallBackMethodName
Quit method kTrue
$addMenuLine - Menu Method
The menu instance receives $addMenuLine messages with the parameters pMenuName and pMenuText. The $addMenuLine method adds a menu line to the menu instance and returns a reference to the added menu line.
Sample code is listed below.
; $addMenuLine(pName,pText,pbElipsis)
; Append ... to the pText if pbElipsis is set to true. Default is false.
Calculate Text as con(pText,pick(pbElipsis=1,'','...'))
; Add a menu line object to the menu instance.
; $add(cText,bEnabled,bChecked)
Do $cinst.$objs.$add(Text,kTrue,kFalse) Returns rMenuLine
; Assign the name to the menu item.
Do rMenuLine.$name.$assign(pName)
; Return a reference to the added menu item.
Quit method rMenuLine
$control - Menu Method
When the user clicks on a menu item, a $event message is sent to the menu item. Since the menu item was added on-the-fly there is no $event message so the message automatically is passed to the $control method of the menu instance.
The mReports menu sends a $printReport message to the registered observers.
The menu's $control method uses $cobj().$name to figure out which menu item was selected by the user. The menu line name is used prefixed with a $ character and used as the first parameter sent to the registered observers, the second menu line $text is used as the second parameter sent to the registered observers.
Sample code is shown below.
On evClick
; Test to make sure the callback message can be sent to the observer.
If irObserver.[iCallBackMethodName].$cando
; Send a message to the observer.
Do irObserver.[iCallBackMethodName]($cobj)
Else
; Unable to send the message. Report an error.
OK message [sys(85)] (Icon) {The call back method, [iCallBackMethodName], is not found in the menu events observer of [irObserver().$name].}
End If
Quit method kTrue
Sequence of Events
The following is a summary of event for the demo.
- The window class is instantiated. The $construct method calls $constructMenus.
- $constructMenus adds and instance of the mMenusOnTheFlyDemo menu class as a window menu to the window's $menus group, return a reference to the menu instance to the local variable rMenu.
- The $constructMenus method sets the $title property of the menu instance to Reports.
- $constructMenus sends an $addEventsObserver($cinst,'$doMenuCmnd') message to the menu instance, adding itself as the observer and $printReports as the dispatcher method.
- The menu instance stores the window instance as an observer of menu events, and $doMenuCmnd as the call back method.
- $constructMenus sends an $addMenuLine('Report1','Report 1') message to the menu instance.
- The menu instance adds the menu line , and sets the $name property to Report1.
- The user selects the menu line .
- Omnis Studio sends an $event message to the menu line.
- The message is automatically passed to the $control method of the menu instance.
- The $control sends a $doMenuCmnd message to the registered observer. A reference to the selected menu line is passed as the first parameter.
- The window instance receives the $doMenuCmnd message.
- The $doMenuCmnd method forwards the call to $Report1.